Showing posts with label Easter. Show all posts

Reese's Peanut Butter Egg Cookies


2 1/3 cups all-purpose flour
1 teaspoon baking soda
1/2 teaspoon salt
3/4 cup unsalted butter, softened
3/4 cup firmly packed brown sugar
1/2 cup granulated sugar
2 large eggs
1 1/2 teaspoons vanilla extract
20 Reese's Peanut Butter Eggs, chilled


Preheat oven to 350 degrees F. Coat cookie sheets with cooking spray. 

In a medium sized mixing bowl, sift together flour, baking soda and salt. In a large mixing bowl, using a mixer on medium speed, beat together butter, brown sugar and granulated sugar until creamy, about 1-2 minutes; beat in eggs and vanilla until combined. Reduce mixer speed to low and beat in flour mixture until just combined. Chill the dough in the refrigerator for 30 minutes. 

Take a heaping tablespoon of dough into palm of hand and flatten to about 1/8-inch thick; place peanut butter egg into the center, wrap dough around egg and smooth out the surface. Place on cookie sheets and repeat process. Space the cookies about 1 1/2-inches apart. Bake for 10-12 minutes or until golden brown. Transfer to wire racks to cool.


Makes 20 big cookies.


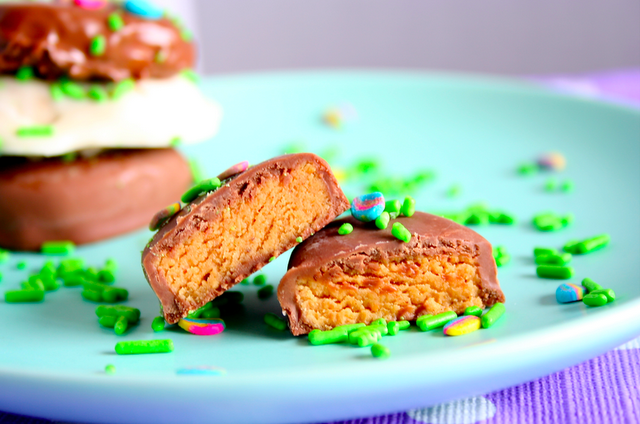
Homemade Peanut Butter Eggs


1/4 lb butter, softened
8 ounces cream cheese, softened
2 lbs confectioners' sugar
1 1/2 cups peanut butter
1 1/2 teaspoons vanilla
1/2 teaspoon salt
20-23 ounces milk chocolate chips, or white chocolate dipping chocolate.


Mix the butter and cream cheese together. (I put mine in the microwave for 40 secs. to soften), then cream together. 

Add the confectionery sugar about 1 cup at a time, and mix well. 

Add the peanut butter, vanilla, and salt, and mix until well-blended. 

Place the mixture in the refrigerator to chill for at least 1 hours (I stuck the bowl in the freezer for about 1/2 hr., to harden the dough.) 

Form the peanut butter mixture into egg shapes, then refrigerate again for at least 1 hour (Again, I put them in the freezer instead of the fridge). 

Melt the chocolate in a microwave oven or in a double boiler. 

Quickly place the eggs, doing one at a time, in the chocolate mixture to coat the bottom, then lift it with a thin spatula, and with a knife I spread all along the sides and top of the egg, then with the knife I fluff the top of the chocolate to make the eggs look pretty. 

You have to work quickly while the eggs are frozen, as the heat from the chocolate chips makes them soft again rather quickly. If you notice them getting too soft, stick them back in the freezer for a few minutes. 

Arrange the chocolate coated eggs on a waxed paper lined tray, and allow the chocolate to harden. (I stick mine in the freezer for easier handling when coating with the chocolate).


Cadbury Creme Egg Brownies


 4 1/2 Cadbury Creme Eggs (total of 9 halves)
 3/4 cup all purpose flour
 1/2 cup unsweetened cocoa powder
 1/4 teaspoon kosher salt
 3/4 cup packed light brown sugar
 3/4 cup sugar
 1/2 cup (1 stick) unsalted butter, melted
 1 Tablespoon vanilla extract
 2 large eggs, at room temperature
 1/2 cup semi sweet chocolate chips


Preheat the oven to 350 degrees F. 

Cut the Cadbury Eggs along the crease. You should have a total of 9 halves. Set aside. 

Sift together the flour, unsweetened cocoa powder and kosher salt. Set aside. 

In a large mixing bowl with the paddle attachment (a handheld mixer works too), mix together the packed light brown sugar, sugar, melted unsalted butter and vanilla extract on medium speed for 3 minutes.

 Add in the eggs one at a time and mix. 

Slowly add in the dry ingredients on low speed. Mix until just combined. Take a spatula and fold the ingredients together.

 Throw in the semi sweet chocolate chips and fold them in. 

Spread the brownie batter into a lightly greased 8×8 inch baking pan. The brownies will bake for a total of 30 minutes at 350 degrees F.

 Once the brownies have baked for 25 minutes, remove them from the oven and carefully press the Cadbury Creme Eggs on top of the brownies. The center of the Cadbury Eggs should be facing up. 

Put the brownies back in the oven and continue baking for 5 more minutes. 

Cool the brownies and then cut into pieces. Enjoy!


Easter Egg Hunt (Surprise Inside) Cookies

Ingredients 

2 ½ cups flour
1 teaspoon baking soda
1 teaspoon salt
1 cup Crisco (I used butter-flavored)
¾ cup white sugar
¾ cup brown sugar
1 teaspoon vanilla
2 large eggs
24 mini Cadbury Eggs  

Optional: Green Buttercream/any frosting you like – I use the Wilton recipe as a guide 

Jelly beans


Directions 

1.   Preheat oven to 350 

2.   Cream Crisco, white and brown sugars, and vanilla in the bowl of your mixer. Add eggs one at a time. 

3.   In a separate bowl combine flour, baking soda, and salt. Gradually add flour mixture to wet ingredients. The dough will start to pull away from the bowl of the mixer.  

4.   Using about a tablespoon of dough wrap a mini Cadbury egg so it is completely covered. Place the cookie inside a greased mini muffin tin. You do not want to use much more than a tablespoon of dough or the cookie will spread far over the top of the pan.  

5.   Bake at 350 for about 9 minutes or until golden. ***IMPORTANT*** Let the cookies cool in the pan for about 10-12 minutes until you can “twist” it out. Using your fingertips gently try to twist the cookie to remove it. If the cookie seems too soft like it will break apart wait 2 minutes and try again. If your muffin tin is greased the cookie will lift out whole after about 10-12 minutes. But do not let your cookie cool completely in the tin or it may adhere itself to the pan and then you will have to scrape it out.   

6.   Let cookies cool completely (or just eat one warm!), top with frosting and jelly beans.


Cream Egg Brownies


Yield: 16 brownies 

Ingredients:


For Brownies:

 2/3 cup flour
 2 tablespoons dark or Dutch processed cocoa powder
 1/2 teaspoon salt
 6 ounces milk chocolate, chopped
 1/2 cup (1 stick) unsalted butter, cut into cubes
 1/4 cup granulated sugar
 1/2 cup light brown sugar, packed
 2 large eggs, at room temperature, lightly beaten
 1 teaspoon vanilla extract


For Cream Filling:

 1/4 cup light corn syrup
 2 tablespoons unsalted butter, room temperature
 1/2 teaspoon vanilla extract
 1/8 teaspoon salt
 1 1/2 cups powdered sugar


For Glaze:

 3 ounces milk chocolate, chopped
 2 tablespoons unsalted butter, cut into cubes 

Directions: 

Preheat oven to 350ºF. Line the bottom and sides of a 8-by-8-inch pan with parchment paper, leaving a slight overhang on two edges. 

Sift together flour, cocoa, and salt in a small bowl and set aside. 

Melt chocolate and butter in a double boiler or a medium-large bowl set over gently simmering water. Stir until smooth, then remove from heat. Whisk in sugars and stir until dissolved and mixture has cooled slightly. 

Whisk in eggs and vanilla extract until just combined (do not overmix). Sprinkle flour mixture over top and fold in to chocolate mixture using a large rubber spatula until just incorporated. Pour into prepared pan. 

Bake for 25 to 30 minutes or until toothpick inserted into the middle comes out clean. Transfer pan to a wire rack and allow to cool completely. 

For cream filling, beat together corn syrup, butter, vanilla, and salt on medium-high speed until smooth. Add powdered sugar, a little bit at a time, mixing until creamy. Dump 3/4 of the cream mixture on top of cooled brownies and spread into an even layer. Add a drop of yellow food coloring to remaining cream mixture and stir until evenly colored. Drop dollops of yellow cream on top of white layer, and then swirl gently with a spatula. Refrigerate for at least 2 hours or until set. 

Gently melt chocolate and butter together in a double boiler or a small saucepan set over low heat. Stir until smooth. Pour over cream filling, carefully spreading into a thin, even layer. Return to refrigerator and chill until set, at least 30 minutes, or overnight if possible (brownies are best when chilled overnight). 

Remove brownies from pan using the edges of the parchment paper to lift the entire block out of the pan. Using a large sharp knife, cut into 2-inch squares. Brownies will keep, refrigerated in an airtight container, for up to 5 days.


Chocolatey NestEgg Shortbread Cookies


Nestlé Crunch NestEggs and raspberry jam combine to make these tasty Easter cookies. Perfect for surprising that special someone.


Cookies:

1 (13-ounce) package NESTLÉ CRUNCH NestEggs, unwrapped

NESTLÉ Milk Chocolate NestEggs

1 cup (2 sticks) butter, softened

2/3 cup granulated sugar 1/2 teaspoon vanilla extract

2 cups all-purpose flour

1/2 cup raspberry jam Glaze:

 1 cup powdered sugar

1 tablespoon butter, softened

1 tablespoon milk or water


1.For Cookies: Beat butter, granulated sugar and vanilla extract in large mixer bowl until creamy. Gradually beat in flour. Cover; refrigerate for 1 hour.

 2.Preheat oven to 350°F (175°C).

 3.Shape dough into 1-inch balls; place 2 inches apart on ungreased baking sheets. Press thumb into tops to make 1/2-inch-deep depressions (dough will crack around edges). Fill each depression with about 1/4 teaspoon jam.

 4.Bake for 14 to 16 minutes or until edges are lightly browned. Immediately press 1 Nestlé NestEgg into center of each cookie. Cool cookies on baking sheets for 2 minutes; remove to wire racks to cool completely.

 5.For Glaze: Combine powdered sugar, 1 tablespoon butter and milk in small mixer bowl; whisk until smooth. Add more milk if needed. Drizzle over tops of cookies.


Makes 42 cookies.


Home-made Peanut Butter Eggs


Ingredients:


1 lb + 1 cup confectioner's sugar

2 sticks of butter, softened

1 1/2 cups peanut butter

1 lb melting chocolate, melted (I used chocolate discs from Michael’s)

Directions:


Mix first three ingredients together well and form into egg shapes. Place in freezer and freeze until firm. Dip eggs into melted chocolate and place on waxed paper to set. You may have to re-freeze some of the eggs before dipping them if they start to get too soft.

 http://www.whatmegansmaking.com/2011/04/homemade-peanut-butter-eggs.html

Easter Italiantaralli Cookies


These traditional Italian Easter Cookies are a sweet biscuit with a confectioner's glaze. Here is my version of our family recipe.
  • Servings: 32

Ingredients:
Cookie Dough:
5½ cupsAll-purpose Flour
1½ TbspBaking Powder
6Large Eggs
1½ cupsGranulated Sugar
12 TbspUnsalted Butter, 1 ½ sticks), melted and cooled
2 TbspVanilla Extract
¼ tspAlmond Extract
3 dropsYellow Food Coloring
1 cupConfectioner's Sugar, for dusting board and hands
Icing:
3 cupsConfectioner's Sugar
4 TbspHalf & Half, or heavy cream
1 tspVanilla Extract
½ tspLemon Extract, or a few drops fiori di sicilia*
Multicolored Candy Decorations, nonpareils

Directions:

1. MAKE THE DOUGH: In a large bowl, combine the flour and baking powder and whisk together. Set aside.

2. In the bowl of a stand mixer, whisk together the eggs by hand.

3. Set the mixer bowl with the beaten eggs onto the stand. On medium speed add the granulated sugar in a steady flow.

4. Continuing on medium speed, add the melted butter, vanilla and almond extract and yellow food coloring.

5. On low speed add the flour mixture in 1/4 cup increments until a soft dough forms. The dough will be soft and sticky.

6. Refrigerate the dough for 1 hour or preferably overnight.

7. Preheat the oven to 350 degrees. Arrange 2 racks in the middle of the oven. Line 4 cookie sheets with parchment paper (reuse for second batch). On a surface or Silpat mat dusted with confectioners' sugar, turn out the dough and knead lightly for 1 minute. Dust your hands with the confectioners' sugar so the dough does not stick.

8. Use a large bench scraper to break off pieces of dough; work with a small piece of dough at a time. Roll each piece into a 4.5 to 5" rope about 3/4 inch thick. Form into a crossed ribbon and push the knot down even with the cookie with the ball of your thumb. Arrange 9 cookies on each cookie sheet. Bake 2 sheets at time for 10-15 minutes or until the cookies are puffed and just turning golden brown. Cool for 15 minutes before icing.

9. MAKE THE ICING: In a small sauce pan on very low heat, whisk together the icing ingredients until JUST warmed. Do not over heat. Use the icing immediately. You may have to reheat while icing the cookies to keep the liquid consistency. The icing hardens very quickly! Paint or drizzle each cookie with icing and immediately sprinkle with nonpareils. Ask someone to help with this step if you can. If the icing hardens the nonpareils will NOT stick.

10. Store the cookies in an even layer between sheets of wax paper in a tin or plastic container.
*Flora Di Sicilia is sold exclusively by King Arthur Flour in the Bakers Catalog online or in print. The flavor is vanilla with lemon and orange accents. A few drops are all you need.

Bunny Cake Bites


Level: Easy
Prep Time: 1 hour to 1 hour 15 minutes
Cool Time: about 1 hour
Refrigerator Time: 2 hours
Ready In: about 4 to5 hours
Yield: about 48 balls

Ingredients:· 1 package (16 oz) Vanilla Candy Coating
· 1 box Yellow Cake Mix (plus ingredients for mix)
· 1 container vanilla or cream cheese frosting
· 1 bag Large Marshmallows
· Pink sprinkles (decor crystals)
· Pink heart-shaped sprinkles
· Cake writing icing

Instructions:
1. Prepare and bake Cake Mix as directed on box; cool completely. Crumble cooled cake into a large bowl. Mix thoroughly with frosting. Roll mixture into quarter size balls and place on cookie sheet; chill until firm.

2. Cut the edge of a marshmallow diagonally in the shape of bunny ears. These will form the bunny “ears.” Sprinkle with pink decors onto the sticky side of the marshmallow (for best results, press the sticky side of the marshmallow into the sprinkles).

3. Melt Vanilla Candy Coating according to the directions on the package.

4. Coat a cake ball in the Vanilla Candy Coating and place on wax paper.

5. Before Candy Coating has set, place the ears on the top of the cake ball, and place one heart-shaped sprinkle on the front of the cake ball for the nose.
6. Draw two dots for eyes with writing icing.

Tip: If cake bites become too soft or are not holding their shape while being dipped, place back in the refrigerator for 20-30 minutes.
  
Print Friendly and PDF