
Dana's Notes: This recipe was loosley translated with Google Translate . The wording is a bit off, but I think you can still figure out how to create this recipe . You basically take any sugar cookie recipe and color the strips with food coloring . Then you weave them and cut into shapes with cookie cutters before baking . That should simplify this recipe even further for you .
~~~~~~~~~~~~~~~~~~~~~~~~~~~~~~
I have added to the dough and food coloring have woven bands of light and dark green, more or less what I saw last week at the Sandeea Blog - The Recipe for Happiness (which makes things cool this girl) and then cut trees. To have cut red mass stars and I have joined before baking to be beaten. I think it would have been better put some time in the freezer before baking. Finally when cool the cookies, I stuck a silver beads with a few dots of Glasa and I painted the red star with pearl dust (although almost not perceived).
Ingredients (for 16 cookies of 15 cm.)
300 g. flour
1 egg
150 g. butter (must weigh time out of the fridge, that is at room temperature)
70 g. sugar
1 pinch of salt
1 tablespoon of essence and spices (I do not usually put-option-)
Preparation:
1. Beat butter until creamy, add sifted sugar to butter and integrate.
2. If you want to put some essence, add it now and then go pouring the slightly beaten egg gradually.
3. Sift the flour, add a pinch of salt and with the mixer running, add spoonful by spoonful.
Processing :
1. Pour into the bowl all the ingredients in the order details and schedule 20 seconds on speed 6.
2. Roll dough between two sheets of putting plastic wrap or parchment paper to leave 0.5 mm
3. Remove the plastic and cut with cookie cutters.
* Preheat oven to 170 degrees, and no air bake for 12 minutes, to leave them out a few minutes in the same tray, and transfer them to a wire rack to cool and continue simmering.
To cover the cookie, use real Glasa, I've been preparing for many years before using it to cover the birthday cakes, and really just trying to catch him is to the point.
Ingredients for the real Glasa profiling:
1 egg white
200 g. sugar
1 teaspoon lemon
gel food coloring
To cover the cookie with Glasa, start by adding a tablespoon of water, sometimes I've added two, depends on the temperature or humidity that we have.
Preparation for profiling:
1. Pour ingredients into the bowl and set 20 seconds at speed 6. The texture should be as strong for sufiente to "draw" keep drawing.
2. Pour into a pastry bag with a nozzle # 2, and refine the design of the cookie, with the coloring of your choice.
3. To cover the cake, I add the water and fill a "bottle", considering that the dye that we put it as close to profiling. Also for the color to be as similar as possible, in a bowl coloring Glasa profiling, fill that need in a sleeve, and the rest add the water to get the Glasa for filling.
4. Test before, and check that shed Glasa, is slipping, and filling the cookie (we can count to ten, and if it melts completely Glasa to join, this perfect), if a hole is empty, a little help with a toothpick.
5. Before packing allow to dry thoroughly, and if we are to use multiple colors in a single cookie, let it dry completely before drawing with another color, or we could expand and spoil our cookie.
Cookie Express {}
Description: Crackers or pastry pastry with sugar and spices, according to this recipe
Servings: 3 cookies
Ingredientes Ingredients
- 1 sheet of pastry, or pastry
- 1 heaping tablespoon vanilla sugar or cinnamon. If you do not, use regular sugar and ground cinnamon
- 1 tablespoon melted butter
Preparation
- Preheat oven to 200 º C
- We extend the pastry sheet on the same parchment that comes with the package
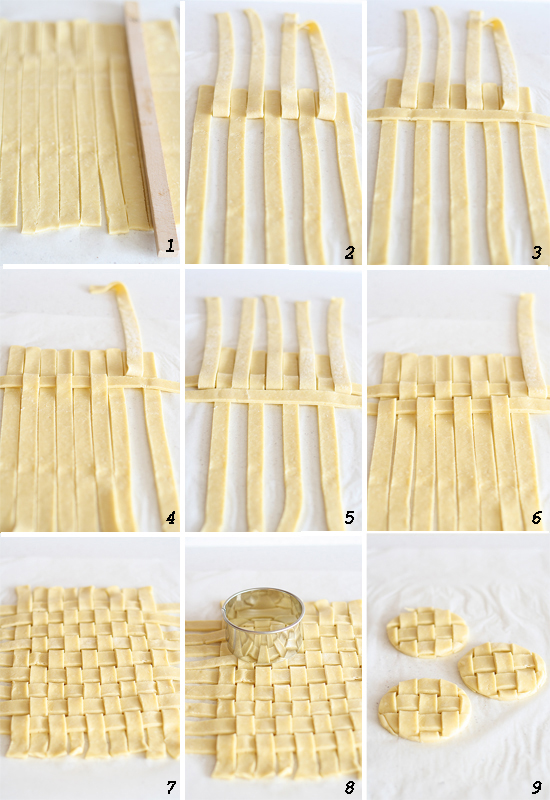
- Mass cut into strips using a sharp knife. I used a wooden plank as a guide.
- We developed the lattice as shown in the pictures: we raised alternating strips, place a strip perpendicular, down the strip we had climbed, and climbed down those who stayed. It's more complicated to explain than do, really.
- Cut biscuits with a tin of diameter slightly larger than the cups. Not fancy, hey, just for that cookie that is fixed to the edge of the cup.
- We removed the excess dough, trying not to move the cookies (Dough can be kneaded leftovers and re-stretch to make cookies).
- Varnished cookies with melted butter, sprinkle with sugar and flavored with cinnamon or vanilla. Be generous with the sugar, is the only thing that brings sweetness to the cookies.
- We place cookies on parchment to a baking sheet.
- Bake 10 minutes at 200 ° C, until lightly browned.
- We turned off the oven, which we know and some have it on since I started the blog.
- Serve over hot chocolate cups.
Variations
For flavored with vanilla or cinnamon sugar, just put a cinnamon stick or vanilla bean in an airtight container full of sugar.
{Lattice cookies} Lattice {cookies}
Summary : Lattice Pie Crust Cookie Toppers Recipe, after this recipe Summary: Lattice Pie Crust Toppers Cookie Recipe, After This recipe
Ingredients Ingredients
- 1 sheet dough for pie crust 1 sheet dough for crust foot
- 1 tablespoon vanilla or cinnamon sugar 1 tablespoon vanilla or cinnamon sugar
- 1 tablespoon butter, melted 1 tablespoon butter, melted
Directions Directions
- Preheat oven to 400º F Preheat oven to 400 º F
- Roll out dough Roll out dough
- Using a sharp knife slice the dough as shown on the pictures above Using a sharp knife slice the dough on the pictures as Shown Above
- Create lattice pattern with strips of dough Create pattern with lattice strips of dough
- Cut out rounds slightly larger than mug Cut out rounds Slightly larger than mug
- Brush tops with melted butter, and sprinkle with sugar Brush tops with melted butter, and sprinkle with sugar
- Bake for 10 minutes until golden brown Bake for 10 minutes Until golden brown
Number of servings (yield): 3 cookie toppers
http://translate.google.com/translate?layout=1&eotf=1&tl=en&u=http%3A%2F%2Fsugg-r.blogspot.com%2F2011%2F12%2Fgalletas-decoradas-de-navidad-para-un.html
No comments:
Post a Comment
Note: Only a member of this blog may post a comment.